If you’re a DIY enthusiast or a professional painter, you’ve likely used painter’s tape before. Painter’s tape is an adhesive tape that is specifically designed for use during painting, as it helps to create clean lines and prevent paint bleed. However, when it comes to selecting the right painter’s tape, you might be wondering about the differences between blue and green tape, and which one is the better choice for your painting project.
Blue Painter’s Tape
Blue painter’s tape is the most commonly used type of painter’s tape. It is made from crepe paper that has a special adhesive that allows it to be easily removed without leaving residue or damaging surfaces. Blue tape is typically used for more delicate surfaces such as drywall, freshly painted walls, and other surfaces that can be damaged by adhesive residue or excessive sticking. The blue tape is also suitable for use on glass, metal, and other smooth surfaces. The tape is available in various sizes, making it a versatile option for both small and large projects.
The advantage of using blue tape is that it is easy to remove, which means that you don’t have to worry about damaging the surface that you are painting or leaving behind a sticky residue. This makes it an ideal choice for use on surfaces that require a bit more care, such as painted walls or trim. Additionally, the blue tape is less likely to tear, which means that you can create sharper lines and curves with ease.
Green Painter’s Tape
Green painter’s tape is a newer type of painter’s tape that has been gaining in popularity in recent years. It is made from a synthetic material that is designed to be more durable than traditional blue painter’s tape. Green tape is typically used on rough or uneven surfaces such as brick, stucco, or concrete. It is also suitable for use on painted surfaces that have been left to cure for an extended period.
One of the advantages of green tape is its ability to adhere to rough or uneven surfaces. This makes it a great choice for use on exterior surfaces such as brick or stucco. Additionally, green tape is more durable than blue tape, which means that it is less likely to tear or damage the surface that you are painting. This can be particularly important when working on large projects, where the tape may need to be left in place for an extended period.
Comparison: Blue vs Green Painter’s Tape
When it comes to selecting the right painter’s tape, the choice between blue and green tape largely depends on the type of surface that you are painting. Blue tape is a better choice for more delicate surfaces that require a bit more care, while green tape is better suited for rough or uneven surfaces.
Another key difference between blue and green tape is their level of adhesive strength. Blue tape has a lower adhesive strength, which means that it is easier to remove and less likely to damage the surface that you are painting. Green tape, on the other hand, has a higher adhesive strength, which means that it is better suited for use on rough or uneven surfaces.
When it comes to price, blue tape is typically less expensive than green tape, which can make it a more cost-effective choice for small to medium-sized projects. However, if you are working on a larger project or need a more durable tape, then the additional cost of green tape may be worth the investment.
Overall, both blue and green painter’s tape have their advantages and disadvantages. When selecting the right tape for your project, it is important to consider the type of surface that you are painting, the level of adhesive strength that you need, and your budget.
Tips for Using Painter’s Tape
No matter which type of painter’s tape you choose, there are a few tips that can help you achieve the best results.
First, always make sure that the surface that you are painting is clean and dry before applying the tape. This will help to ensure that the tape adheres properly and creates clean lines.
Next, when applying the tape, make sure to press it down firmly to ensure that it adheres to the surface properly. You can use a putty knife or a credit card to smooth out any bubbles or wrinkles in the tape.
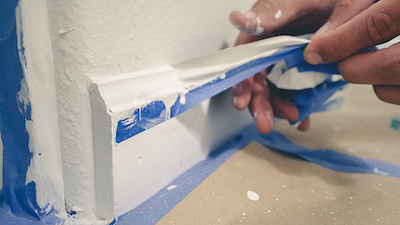
When painting, always make sure to paint away from the tape to prevent the paint from bleeding underneath. It’s also important to remove the tape while the paint is still wet to prevent it from peeling off or damaging the surface.
Both blue and green painter’s tape have their advantages and disadvantages, and the right choice largely depends on the surface that you are painting. Blue tape is a great choice for delicate surfaces that require a bit more care, while green tape is better suited for rough or uneven surfaces. When using painter’s tape, it’s important to follow best practices for application and removal to ensure that you achieve the best results. With the right tape and techniques, you can achieve clean, professional-looking paint lines that will make your painting projects stand out.